Friday, June 08, 2012

Dance Recital!

Caroline had her tap and ballet recital last Sunday.  Her tap routine was to "Puttin' on the Ritz" and her ballet was a jester dance.
Unfortunately, they don't let you video the performances. She did such a wonderful job. I was so proud of her.  In fact, I almost didn't get to see her at all because I started tearing up when she walked on stage!  Here are the pictures from the dress rehearsal and then pre- and post- show the day of the recital.


Here is a video of the dress rehearsal - Link

1st attempt at french bread

It turned out okay, but not good enough to make again. The dough was a total sticky mess and a pain to work with. For all the work, I wanted the bread to be pretty darn amazing, and it just wasn't.
I think I'll stick to buyingmy baguettes at the grocery store for a while longer!

Thursday, June 07, 2012

2 more recipes - S'more bars and Pulled Pork


S'more Cookie Bars

1/2 cup butter, room temperature
1/4 cup brown sugar
1/2 cup sugar
1 large egg
1 tsp vanilla extract
1 1/3 cups all purpose flour
3/4 cup graham cracker crumbs (approximately 7 full graham crackers)
1 tsp baking powder
1/4 tsp salt
2 1/2 large (4.4 oz.) Hershey milk chocolate bars
1 1/2 cups marshmallow creme/fluff (not melted marshmallows)

Preheat oven to 350°F. Grease an 8-inch square baking pan.
In a large bowl, cream together butter and sugar until light. Beat in egg and vanilla.
In a small bowl, whisk together flour, graham cracker crumbs, baking powder and salt. Add to butter mixture and mix at a low speed until combined. Divide dough in half and press half of dough into an even layer on the bottom of the prepared pan. Place chocolate bars over dough. Two 4.4 oz. Hershey’s bars should fit well side by side, and then add a few thin strips of chocolate from the remaining bar so a single layer of chocolate covers the dough completely.  Spread marshmallow fluff evenly over the chocolate layer.
Place remaining dough in a single layer on top of the fluff. This is most easily done by putting the second half of the dough in a gallon size freezer bag. Use your palms to flatten it out, and then use scissors to cut down both long sides of the bag, so it will open up book-style. Open it up carefully, and the dough will stick on one side of the bag. Then place the bag, dough side down, on the other three layers. From there peel the bag up ad spread the dough where it is uneven.
Bake for 30 to 35 minutes, until lightly browned. Cool completely before cutting into bars
Makes 16 cookie bars.


BBQ Pulled Pork Sandwiches
(This recipe turned out SO much better than the recipe I've used in the past.  Liquid smoke makes all the difference!)
INGREDIENTS:
 3 to 4 pounds boneless pork shoulder (Do NOT use pork tenderloin)
1/4 teaspoon fresh ground pepper
 1/4 teaspoon salt
 2 cups water
 1 tablespoon hickory flavored liquid smoke
 2 cups barbecue sauce

DIRECTIONS:
 Rinse the pork shoulder and pat dry. Rub salt and pepper a bit of lawry''s seasoned salt over the pork and place in a slow cooker. Add water and liquid smoke. Cook on low setting for 8 to 10 hours, until the pork is very tender.
Remove the pork from the slow cooker and discard the remaining liquid. Shred the pork using a couple of forks, discarding any layers of fat. Place the meat back in the slow cooker along with the barbecue sauce and continue to cook for another 20-30 minutes until the pork is hot again. Serve on buns with extra barbecue sauce.

http://www.melskitchencafe.com/2010/08/bbq-pulled-pork-sandwiches-slow-cooker.html

More new recipes

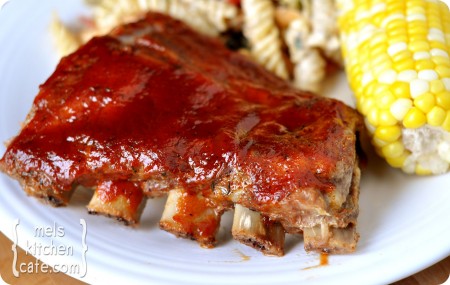
I tried a new recipe for oven-baked ribs and really liked the results. The kids LOVE ribs. The husband, not-so-much, so I like recipes where he doesn't have to grill them. I modified the recipe ever-so-slightly to match our family's tastes.

Kim’s Oven-Baked Ribs  (taken from one of my new fav recipe sites -http://www.melskitchencafe.com/ )
 

*Note: when working with baby back ribs, the silver skin will need to be removed. Here is a great visual tutorial to help simplify the process (it’s not hard, I promise!). Also, take note that the ribs need to be refrigerated with the rub prior to cooking for 8 to 48 hours so plan ahead!

*Makes 2 slabs ribs

INGREDIENTS:
 2 whole slabs pork baby back ribs, silver skin removed

Dry Rub:
 8 tablespoons light brown sugar, tightly packed
 2 tablespoons kosher salt (Morton’s brand – other brands may vary in strength)
 1 tablespoon chili powder
 1/2 teaspoon ground black pepper
 1/4 teaspoon cayenne pepper (recipe calls for 1/2 tsp, but my kids don't like spicy!)
 1/2 teaspoon smoked paprika or regular paprika
 1/2 teaspoon Old Bay seasoning
 1/2 teaspoon onion powder
 1/2 teaspoon garlic powder
1-2 cups BBQ sauce

DIRECTIONS:
 In a bowl, combine all dry ingredients and mix well. Place each slab of baby back ribs on a piece of heavy-duty aluminum foil or a double layer of regular tin foil, shiny side down. Sprinkle each side of the ribs generously with the dry rub. Pat the dry rub into the meat. Wrap the ribs tightly in the foil and refrigerate the ribs for a minimum of 8 hours or overnight and up to 48 hours.

When ready to bake the ribs, preheat oven to 250 degrees F. 
Place the ribs (still in the foil packets) on a foil lined baking sheet and bake the ribs in the oven for 2 1/2 hours-3 hours or until tender when picked up with tongs. The meat will come easily off of the bone!

Remove ribs from foil and place on another foil lined baking sheet. Brush with your favorite BBQ sauce and broil until charred and bubbly. Alternately, you can grill the ribs at this point, if you like, but sometimes they are falling off the bone and are so tender that it is a little difficult. Cut the ribs into individual portions (2-3 ribs per person). Serve with additional BBQ sauce, if desired.


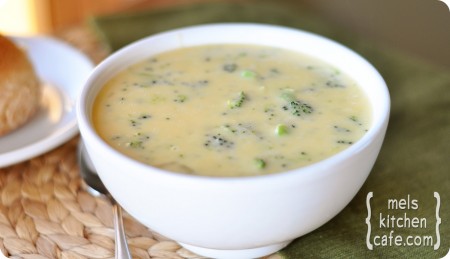
We had a colder week here last week, so I tried a new soup and loved it.  Good ol' broccoli cheese soup! 

Broccoli Cheese Soup

*Serves 4

INGREDIENTS:
 1 3/4 cups chicken broth
 1 small onion, diced
 1/3 cup all-purpose flour
 1/4 cup (4 tablespoons) butter
 1/2 teaspoon pepper
 1/2 teaspoon salt
 2 cups milk
 1 1/2 cup shredded cheddar cheese (and it tastes best if you buy a brick of cheese and hand-grate it yourself.)
 1/2 cup shredded swiss cheese
 2 1/2 to 3 cups chopped, lightly steamed or blanched broccoli (this can easily be done in the microwave. )

DIRECTIONS:

 Simmer chicken broth and chopped onion for 15-20 minutes in a covered small saucepan, until onions are soft. Heat milk in microwave for 1-2 minutes. In a separate medium-to-large-sized stockpot, melt butter then add flour, salt and pepper. Cook together, stirring constantly, for 2 minutes, then whisk in warmed milk. Stir and heat together on medium heat until soup starts to thicken, about 5-8 minutes. While waiting for it to thicken, steam chopped broccoli in the microwave for 3 minutes in a bowl covered with saran wrap.  Add warmed chicken broth to the stockpot and continue to stir until well blended.  Grate cheeses. Add cheeses to stockpot and stir until completely melted. Stir in steamed broccoli. Add more salt and pepper to taste, if needed. Serve immediately in bowls.

Recipe Source: melskitchencafe.com

Sunday, June 03, 2012

First Lake trip of the summer

Over Memorial Day weekend, we took our first family trip to Clear Lake.

 The kids LOVED playing at the beach, swimming, and building rivers in the sand.
 One highlight was "helping" Boppy and Daddy put the boat in the water.


 Everyone loved dinner at Caruso's.
 My kids are definitely not afraid of the sand, especially the older 2. They literally roll in it!


 Kevin had some good ski runs.
And the kids had a few fun raft rides.


The kids enjoyed some ice cream at the "Sweet Retreat".

 Caroline and Clayton tried tubing for the first time and LOVED it!


 We watched the sunset together as a family (and Kevin and I got to enjoy one on another night on the boat in the middle of the lake with a bottle of wine. Woo hoo!)
Austin got to drive the boat and LOVED it!
 A rare site - the three Scott children actually sleeping in the car.  Phew!

Friday, June 01, 2012

Corn on the Cob - new method!

My kids all love corn on the cob, so I like to make it for dinner even when it's not "prime Illinois sweet corn season".  The kids (nor I, for that matter), like anything extra on their corn. Just butter, salt, and pepper.  In the past, I've always boiled it in salted water.  Tonight, however, I tried a new preparation  and really loved the results.  I can't wait to try it on peak-season local corn!

I found the recipe on Mel's Kitchen Cafe website.
http://www.melskitchencafe.com/2010/07/perfect-corn-on-the-cob.html
Corn on the Cob

Here is the recipe:

Perfect Corn on the Cob
INGREDIENTS:
7-8 ears of corn, husked and silky threads removed
2 tablespoons sugar
2 tablespoons white vinegar
DIRECTIONS:
Bring a large pot of water to a boil (probably about 4-6 quarts of water). When boiling, add the sugar and vinegar and bring to a full boil again. Add the husked corn, submerging all the ears in the water the best that you can. Bring the water to a full boil again. This is important! It may take a few minutes for the water to come back to boiling temperature once the corn is added but let it come to a full boil before moving on. Once the water is at a full boil, cover the pot, remove from the heat and let the corn sit in the hot, steaming water for 10 minutes. (The corn can stay in the water for up to 20 minutes without becoming pithy and dry.)  Remove the corn, roll in butter, and sprinkle with salt and pepper.